Overview
A slow website leads to a poor user experience. The bounce rate will grow and page views will fall terribly. Learn with Reade from CodeClouds how you can drastically improve your site’s performance and learn some tips for dealing with inconsistency with your server.
.png?updated_at=2023-07-28T10:45:31.691Z)
In this age of instant updates, same-day delivery, and otherwise high customer service expectations, site visitors simply are not going to wait around for your website to download. Web performance and download speeds are a growing research showing that milliseconds can make a real difference in customer behavior and get those sales conversions.
Most website owners want their website to be the best on the web, and in doing so, add all the ‘bells and whistles’ such as animations and scroll effects. These are all fun and dandy providing the user doesn’t have to wait 10 seconds for the page to download and render.
Today’s discussion is surrounding web performance and things that web administrators such as yourself can do to improve page load times and create a more consistent and reliable service.
In today’s article, we’re going to look at methods such as GZIP compression, Varnish, and NGINX and see what sort of impact such inclusions have.
We’re currently running WordPress on a single processor server, served with Apache2.4. We’re going to add the above methods to see what sort of improvements we actually get and we’ll be running some tests along the way.
Before we get started, I ran some performance tests using LoadImpact so we’re able to see our benchmark for comparisons. As the test ran, LoadImpact would increase the amount of virtual requests that were made simultaneously, thus simulating higher server activity. We can see the amount of requests made along the blue line, which is noted along the right axis.
We saw incredible inconsistency within page load times and even with the simplicity of a simple WordPress blog, we saw load times over 6.6 seconds, with the average load time of 2.61 seconds.
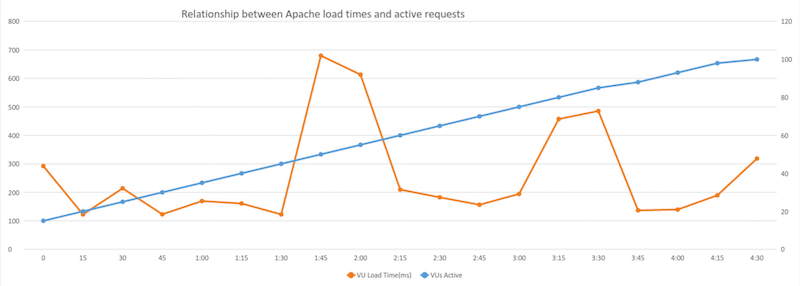
I was simply blown away with how such a renowned server was able to produce such skewed and distorted results.
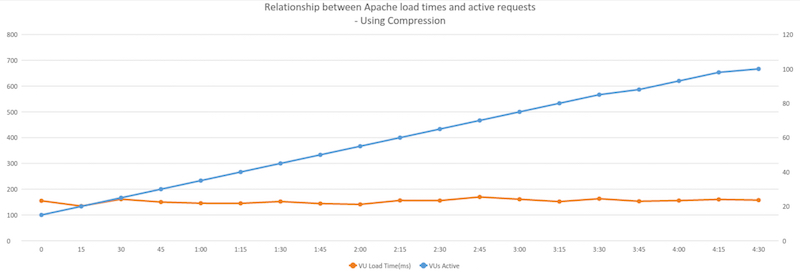
Our first method of call is compression, GZIP compression is a method of compression files for faster network transfers. Compression enables your server to provide smaller files and thus improving download times to your users. I’m also hoping to see more consistent results after inclusion.
When running Apache, GZIP is super simple to enable, simply just copy and paste the following code into your .htaccess files and you’re done!
<ifModule mod_gzip.c> mod_gzip_on Yes mod_gzip_dechunk Yes mod_gzip_item_include file .(html?|txt|css|js|php|pl)$ mod_gzip_item_include handler ^cgi-script$ mod_gzip_item_include mime ^text/.* mod_gzip_item_include mime ^application/x-javascript.* mod_gzip_item_exclude mime ^image/.* mod_gzip_item_exclude rspheader ^Content-Encoding:.*gzip.* </ifModule>A hand tool I used when testing was the GZIP Compression Test provided by giftofspeed.com.
After I had successfully added compression, I ran another test with LoadImpact. I immediately saw much quicker load times and most importantly saw greater consistency between the results.
For those of you who are still not impressed – I go on.
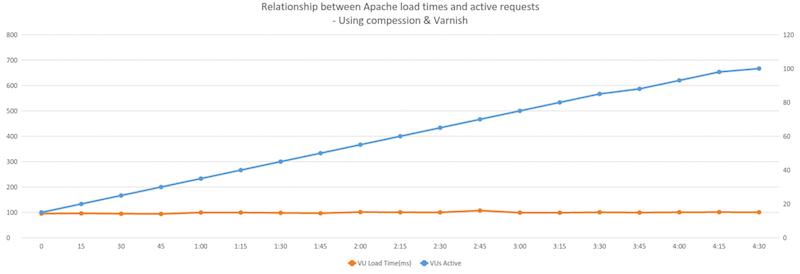
After implementing GZIP compression, I felt more could be done, so I turned to a very handy tool called Varnish.
Varnish is an HTTP accelerator designed for content-heavy dynamic web sites as well as heavily consumed APIs. Varnish works as a ‘middle-man’ between your server and your users. In our case, when a request is initially made, Varnish will forward the request to Apache and Apache will send that data back to the user, however, it will keep a cached version for itself. This way, when the same request is made again, varnish will simply send out the data without the server having to regenerate the content, thus reducing stress on your server and minimising wait times to your users.
We’re going to install the software on port 80 so that by default all our requests will be made to Varnish. Before we do so, we have to move Apache to another port, I’m going to use 8080.
We can move Apache by adjusting the port values in both files:
/etc/apache2/ports.conf and etc/apache2/sites-available/000-default.confOnce we’ve done that we can go ahead and install varnish. We can do so by running:
sudo apt-get install varnishOnce the install is done, we have to tell varnish where to sit and what to listen to.
The default port for Varnish is 6081 – we want to change this to 80. To do this we need to head to the default configuration file and open the varnish configuration. This file is located at:
/etc/default/Once there, we can scroll down to DAEMON_OTPS=”-a :6081″ and change the port to 80.
Once that’s done, we need to tell varnish where Apache is sitting. To do this we’ll now head to the main configuration folder which is located at /etc/varnish. There we can open default.vcl.
A few lines from the top you’ll see a backend default tag. Inside that tag, you’ll see a host value and a port value. We need to change the port value to 8080, if not done already.

We can now save and exit that file and restart Apache and Varnish and head over to our browser. All going well, you should now see the same page on port 80, and 8080. To double check varnish is enabled you can head over to isvarnishworking.uk and enter your URL.
After I had successfully installed Varnish, I again ran some tests, hoping to see the change in the load times. We can see below that we not only improved our load times but we also again made our load times more consistent. Which is great when needing to provide a reliable server to your customers.
My next little trick is called NGINX, “engine-x”. NGINX is a web server. It can act as a reverse proxy server for HTTP, HTTPS, SMTP, POP3, and IMAP protocols, as well as a load balancer and an HTTP cache.
NGINX works exceptionally well with dealing with static content such as images, javascript, HTML, and stylesheets and in general, performs a lot more stable than Apache. What we’ll do is install NGINX in front of Apache to deal with this static content, and whenever a request is made for a PHP file, we can forward that request off to Apache.
Firstly, we need to install the service. We can do this by running the following command in the command line:
sudo apt-get install nginxOnce the installation is complete, we’ll need to head over the configuration files and move NGINX to another port and adjust some settings, including what to do when a PHP file is requested.
We’ll need to open /etc/nginx/sites-available/default and in there look for the server tag. Once there, the first thing we’ll need to change is the running ports lets change the two listen values to 8000.
Below we’ll need to change our root directory to /var/www/html so that it has access to Apache’s files. Directly below that we’ll need to add index.php into the indexing list to make sure NGINX knows what to looks for when no direct file is specified.
Below that we can now add the commands for NGINX to pass on the PHP files. Copy the below code into the file there.
location ~ \.php$ { proxy_set_header X-Real-IP $remote_addr; proxy_set_header X-Forwarded-For $remote_addr; proxy_set_header Host $host; proxy_pass http://127.0.0.1:8080; }location ~ /\.ht { deny all; }Make sure you change the port value, highlighted in red, to the port Apache is running on. In my case, I have Apache running on 8080.
If you’ve forgotten, you can use netstat -tulpn in the command line to check your active ports.
Before saving and exiting, make sure that the other PHP tags are commented out, otherwise this could cause confusion for the server.
We should now add GZIP compression to NGINX, we can do this by uncommenting the GZIP settings in the /etc/nginx/nginx.conf file.
Now that we’re all set that up, we now need to head back into the Varnish configuration settings and tell it to forward traffic through NGINX, rather than Apache.
The file we need to update is located at:
/etc/varnish/Once there, run nano default.vcl and change the backend default port value to the port you just assigned NGINX to. In my case, port 8000.
Now you just need to restart Apache, NGINX, and Varnish and you’re ready to go.
Let’s run one final test!
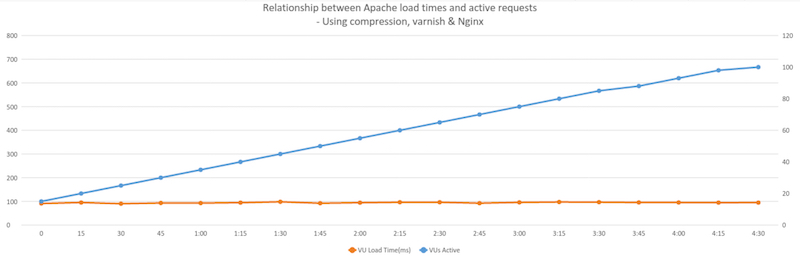
Our average load time dropped by .05 seconds and we are able to see more level results.
Below you can see the direct comparisons between the different test.

I really hope you were able to follow along nicely, and like me, you too were able to increase performance and reliability on your server.
Similar Reads
How can we help?
Tell us about your inquiry and we’ll get back to you as soon as we can.