Overview
Today, were going to take a look at optimizing for Centos virtual private servers running WHM, providing faster websites for your clients. There are a few factors important for any virtual service—security, speed, and ease of use for the end user.
Note: This is part 2 of a multi-part blog post. cPanel/WHM – Optimizing your CentOS Virtual Servers Part I
If you want to succeed with your online business, it’s very important that you provide reliable and secure services.
In today’s blog, we will be looking deeper into Database Tuning, MySQL to MariaDB Migration, Installing APC / APCu as well as how to tune NGINX on your WHM server.

Improving Database Performance
In a dynamic environment, you’ll find large performance improvements by making sure your database is optimized. There are several methods to accomplish this.
SQL Tuning
The methods below are the most common for SQL tuning with cPanel. For more information, you can visit Tweak Settings – SQL.
Allow cPanel & WHM to determine the best value for your MySQL open_files_limit configuration
This setting has cPanel & WHM to determine the optimal size for your open_files_limit setting, which is in your my.cnf file. This number will be automatically determined using the total number of open tables in your databases.
If left off, the default value is 2048 or 5000 depending on the version. There are many cases this needs to be raised, such as servers running multiple WordPress installations or similar. Making it needlessly large wastes memory, and can cause performance issues. For that reason, it’s best to make sure that this is set to on, which should be the default.
Allow cPanel & WHM to determine the best value for your MySQL max_allowed_packet configuration
Max_allowed_packet is a setting in MySQL that determines that max size of a packet, generated/intermediate string, or a parameter sent by the mysql_stmt_send_long_data() C API function.
By default in MySQL, the limit is small. If you are using BLOB column or long strings, you’ll want to raise this limit. The size is in bytes, and must be a multiple of 1024 (or it will be rounded down to the nearest multiple. The default value is 4,194,304 (4 MiB) and the max allowed value is 1,073,741,824 (1 GiB).
By default in MySQL, the limit is small. If you are using BLOB column or long strings, you’ll want to raise this limit. The size is in bytes, and must be a multiple of 1024 (or it will be rounded down to the nearest multiple. The default value is 4,194,304 (4 MiB) and the max allowed value is 1,073,741,824 (1 GiB).
If it is too small, you may get ER_NET_PACKET_TOO_LARGE returned to you on a large packet.
It’s best to make sure this setting is on and let cPanel & WHM determine the right size for you. Keeping it within the realm of reasonable based on your setup, it will catch problem packets that are too large to be right.
Allow cPanel & WHM to determine the best value for your MySQL innodb_buffer_pool_size configuration
If you have InnoDB enabled, this setting applies to you. The value in the mySQL setting is in bytes, and the default is 134,217,728 (128 MiB). This is base 2.
In a lot of cases, if one were to manually change this setting, setting it to about 75% of your total system memory available to mySQL (not total system memory unless you have a dedicated database server) would probably be ideal, requiring less disk access which is great for improving the scalability of a busy server. When making it high like that, however, eats up a lot of memory, and you want to make sure the base OS is not paging in place of using the memory.
Also, this entire buffer pool must be a contiguous memory chunk, which can cause problems on some Windows servers. It can also cause a long initialization time when the system starts. You can avoid this by saving the buffer pool state on shutdown.
If you select On for this setting and allow cPanel & WHM to determine the size, it will follow these rules—
- For servers with less than 512 Megabytes (MB) of RAM, the system sets the innodb_buffer_pool_size setting to 8 MB.
- For servers with between 512 MB and 4 Gigabytes (GB) of RAM, the system sets the innodb_buffer_pool_size setting to a proportional value that is between 8 and 128 MB.
- For servers with more than 4 GB of RAM, the system sets the innodb_buffer_pool_size setting to 128 MB.
We recommend making sure this is on or set to a lower amount than the appropriate setting listed above. On a database with dedicated hardware or a system that has a lot of free memory, you could go less conservative and see a performance improvement, just make sure you’re not overprovisioning the memory.
MySQL to MariaDB Migration
Another option is to forgo mySQL entirely and migrate to MariaDB, which may improve your performance. You may want to do some research and see if MariaDB is right for your use case, and it is worth the effort of switching.
Developed in 2009, MariaDB is a fast and responsive alternative to mySQL that keeps feature parity with the mySQL version of the equivalent version number up to 5.5, then split convention after starting on version 10.0. MariaDB has improved query optimization, faster joins, and other performance improvements over mySQL. It’s shown in some benchmarks to be radically faster than mySQL, of course this depends on your use case.
You can migrate WHM to MariaDB by following these steps:
Note: These steps are for RPM-based Linux distributions (RHL, CentOS, Fedora etc). If you are on a Debian based Linux distro, these steps will be different.
Step 1: Backup existing MySQL data
As always, which such a drastic change, you’ll want at least a server snapshot. It’s also a good idea to also save a duplicate on the live image, like so—
cp -Rf /var/lib/mysql /var/lib/mysql-old mv /etc/my.cnf /etc/my.cnf-oldStep 2: Make sure cPanel no longer handles mySQL updates
You can mark a version of mySQL as uninstalled, which means cPanel/WHM will no longer maintain it.
You can mark a version of mySQL as uninstalled, which means cPanel/WHM will no longer maintain it.
/scripts/update_local_rpm_versions --edit target_settings.MySQL57 uninstalledYou will want this to match the version of mySQL that you have on your server. There can be multiple versions as well.
Step 3: Uninstall any MySQL RPMs
Remove any installed MySQL RPMs.
/scripts/check_cpanel_rpms --fix --targets=MySQL51Remove any installed MySQL RPMs. You can remove multiple by comma separating them
/scripts/check_cpanel_rpms --fix --targets=MySQL51,MySQL55,MySQL57Step 4: Create a YUM repository
Select the version that you want under your distro. You will be given a YUM repository entry, and it will look something like this
# MariaDB 5.5 CentOS repository list - created 2016-08-27 03:26 UTC


# http://downloads.mariadb.org/mariadb/repositories/


[mariadb]


name = MariaDB


baseurl = http://yum.mariadb.org/5.5/centos7-ppc64le


gpgkey=https://yum.mariadb.org/RPM-GPG-KEY-MariaDB


gpgcheck=1
Create this file
/etc/yum.repos.d/MariaDB.repo
And paste the contents of your provided YUM repository entry in it, save.
Step 5: install MariaDB
Use this command to install MariaDB
yum install MariaDB-server MariaDB-client MariaDB-develStep 6: Rebuild easyapache/php/scripts/easyapache --buildInstalling APC
It can be beneficial to run a caching system to reduce the number of dynamic php requests your server has to deal with. APC (Alternative PHP Cache) is a foss caching
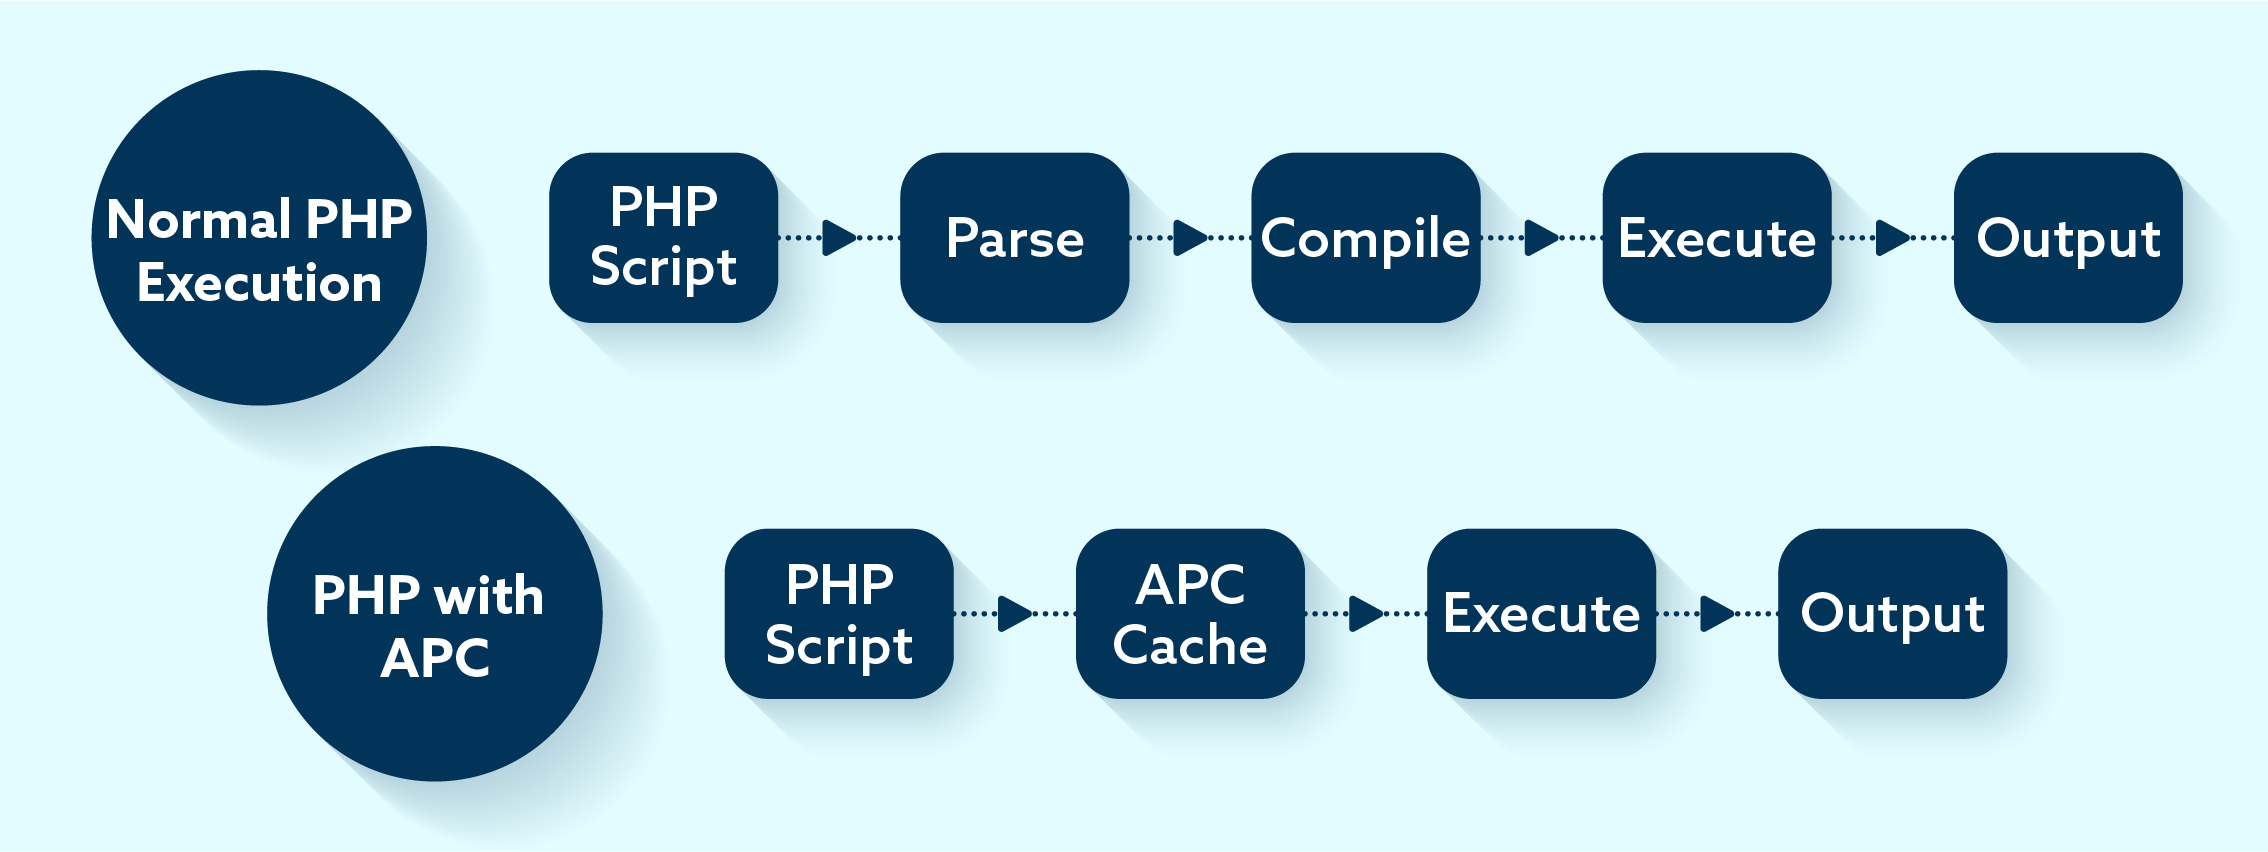
Let’s install it.
Note— This example is CentOS (common default for VPS application installs), and your installation and paths may differ slightly. Your server needs to be running some kind of PHP handler like DSO or FastCGI. Look here to find out more.
Change your current directory to usr/local/src
cd /usr/local/srcPull the source for APC
wget http://pecl.php.net/get/APC-3.1.13.tgzNote: You may want to check what the current stable version is
Extract
tar xvzf APC-3.1.13.tgzNavigate into the extracted folder
cd APC-3.1.13Run
phpizeTo configure APC. You should see some version number info.
Configure your extracted source
./configureMake the APC installation from the source
makeIf everything worked right, the last line returned should be
Build completeLocate your PHP extension_dir
grep extension_dir /usr/local/lib/php.iniYour extension path should be returned, and it should look similar to this
extension_dir = "/usr/local/lib/php/extensions/no-debug-non-zts-20090626" Next copy apc.so to your PHP extension directorycp -frp modules/apc.so /usr/local/lib/php/extensions/no-debug-non-zts-20090626/Back up your php.ini file
cp -frp /usr/local/lib/php.ini /usr/local/lib/php.ini-BAKNow edit the original in VI
vi /usr/local/lib/php.iniAdd these APC settings to the very bottom and save the php.ini file:
extension=apc.soapc.enabled=1apc.shm_size=128apc.cache_by_default="1"apc.shm_segments="1"apc.ttl="7200"apc.user_ttl="7200"apc.gc_ttl="1800"apc.optimization = 0apc.num_files_hint="1024"apc.use_request_time = 1apc.mmap_file_mask="/tmp/apc.XXXXXX"apc.enable_cli="0"apc.slam_defense="0"apc.file_update_protection="2"apc.max_file_size="1M"apc.stat="1"apc.write_lock="1"apc.report_autofilter="0"apc.include_once_override="0"apc.rfc1867="0"apc.rfc1867_prefix="upload_"apc.rfc1867_name="APC_UPLOAD_PROGRESS"apc.rfc1867_freq="0"apc.localcache="0"apc.localcache.size="512"apc.coredump_unmap="0"Restart Apacheservice httpd restartMake a file on your site, name it what you want, like PHPinfo.php
Place the following PHP command in it.
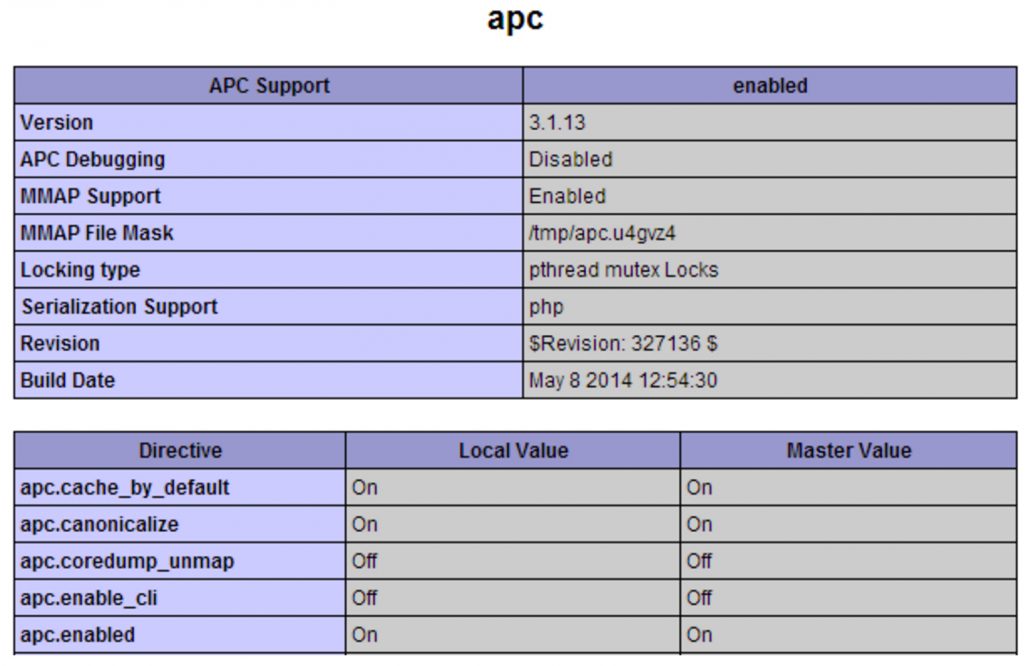
<?php phpinfo(); ?>Open it in a web browser. You should have a section for APC.
If you’re looking for Professional Server Management Services, look no further than CodeClouds. Our dedicated offshore teams will make sure your cPanel/WHM server is configured properly and working efficiently.

If you are a Linux Systems Engineer in Kolkata, you might be interested in having a career at CodeClouds! Head to our careers page to learn more.
Similar Reads
How can we help?
Tell us about your inquiry and we’ll get back to you as soon as we can.