Overview
In this Magento 2 theme customization guide, we’ll be showing how to set up a new theme, extend the blank theme, and start making changes. It can be a little overwhelming starting with Magento, especially Magento 2 which has very few good tutorials available that actually show you how to make changes to your theme, not just create it. For this tutorial, we’ll be assuming you have Magento 2 installed and configured properly. We’re basing this off of Magento Open Source 2.2.4, and while this tutorial currently works with 2+, future versions of Magento 2 may or may not introduce minor changes to this process. Let’s get started.
Set your Magento installation to developer mode
Magento has three modes, default mode, developer mode, and a production mode. In production mode, static pages are cached to improve performance. In developer mode, this is turned off to remove the step of deleting the cache each time your update something.
First, you need to delete the the contents of the following directories in the Magento installation folder
Now make the change to developer mode using this command with elevated permissions.
/var/di/ /var/generation/ Now make the change to developer mode using this command with elevated permissions.
[Magento installation path]/bin/magento deploy:mode:set developer Create theme directory
Navigate to
Create a new directory. Name it what you want your “vendor” to be, which is typically your company name.
[Magento installation path]/app/design/frontend/ Create a new directory. Name it what you want your “vendor” to be, which is typically your company name.
/app/design/frontend/exampleVendor Now create a directory in that folder and name it what your theme will be named.
/app/design/frontend/exampleVendor/exampleTheme .png?updated_at=2023-07-27T04:17:08.806Z)
Extending a theme
Even if you creating a theme from scratch like we are, you should extend a theme. Blank is made just for this, and we’ll be using Blank for this example. If you want don’t want to start with a blank slate and want to learn by replacing, you would extend Luma.
While it is recommended to extend a theme, even if your theme doesn’t have parent sections that are required they will still be provided by the fallback modules, providing basic unstyled XML files. Using the fallback as an example of what shows up and what you need to edit, you can make your theme without extending anything, filling in these functions one at a time while still having a fully “working” install. You should never delete or edit the fallback files! Updates can overwrite these.
Register your theme in the Magento 2 installation
In order to do this, you’ll need to create a file in your theme directory called registration.php
Place this code in the file.
.png?updated_at=2023-07-27T04:17:07.120Z)
Replace exampleVendor and exampleTheme with your names.
Declare your theme
A theme.xml file must be created and placed in your theme’s directory. It must at least contain the theme name and the parent theme name if it has one. For this tutorial, we are extending Blank. If you plan to extend Luma, replace “blank” in the parent section with “luma”
This file is also used to specify the preview image location for the Magento admin panel.
.png?updated_at=2023-07-27T04:19:06.489Z)
Create a Composer package
This is optional if you are just learning, but in order to distribute it you will need to register your theme on a packaging server.
If you are unsure what to use, packagist.org is a pretty standard choice.
To make your theme a package, first you’ll need to create a file in your theme’s directory and name it composer.json
The purpose of this file is to define your theme’s dependencies. Here’s a basic composer.json file that extends Blank.
.png?updated_at=2023-07-27T04:19:06.406Z)
View.xml
View.xml holds all media related settings, and must be present. First, create a new directory in your theme’s folder and name it etc. This is where view.xml goes. Copy the blank theme’s view.xml and place it here to start with.
You can change sections of this to define thing like product images sizes, and settings for your gallery and product image magnifier.
Creating a logo for your theme, extending layout files
First, create a new folder for images in your theme’s web directory. Name it “images”
Create your own logo and save it as an SVG file or any other format you would like and place it in the images folder. We’ll name ours exampleLogo.png
Alternatively, it will be automatically recognised if you place it in /web/images in your theme’s directory and name it logo.svg.
If you want to use a different name or location, you’ll have to declare it in the default.xml file. There’s no need to make the entire file, we’ll make an extending layout file.
To do this default.xml or any other layout file that you’ll need to override parts later, simply create a file of the same name and put it in the same place.
Make a folder called “layout” in your theme’s directory, and make a file called “default.xml”
In that file, place this
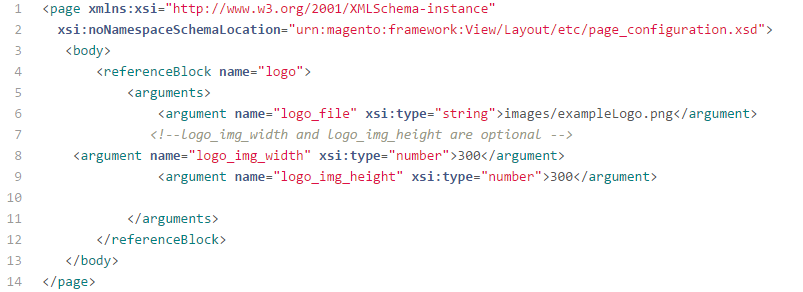
Now your logo should show up in your theme.
Create additional directories
You’re going to need additional directories to store your static files. While the folder convention and naming isn’t strict, the following layout is best practice
.png?updated_at=2023-07-27T04:19:06.297Z)
First customization
Magento 2 theme customization requires using a CSS preprocessor called LESS for styling. Preprocessors help eliminate repetition, allow for variables, nesting, extending, conditional logic, and many other features important for large projects depending on the preprocessor you use. The preprocessor will compile what you wrote into a full CSS file.
Magento 2 does not natively support the more popular and powerful SASS, but it can be modified to do so. However, we’re only going to cover using LESS with server side compilation. In the future, this process can be made faster by checking out Grunt.
First, apply the theme you are working on in the Admin panel. Click Content, Design, then Themes and select your theme.
Add a folder in your theme’s directory called web, a folder in web called css, and a folder in css called source.
In source, make a new file and call it “_extend.less”
Let’s change the color of the buttons

Since the primary buttons are the ones with a color in typical themes and the non primary are grey, we want to target these classes: Action, Primary. Add this to _extend.less.
.png?updated_at=2023-07-27T04:19:06.085Z)
@button-color defines a color variable, meaning using it will allow you to change all of the instances at once. There’s a lot more you can do with it, like defining a color that can be changed in your theme’s settings and having all sides of that color calculated, for example a lighter shade of a color you defined.
There’s a lot more that less can do, and it’s pretty simple to pick up. If you’re not familiar with it, you will need to be for making a Magento theme, so head to the official Less website to get started with learning it.
To see this change, we first need to clear the static files cache. Make sure you’re still in dev mode as instructed at the beginning of this tutorial, and go to System > Tools > Cache Management in the Magento Admin Panel and click “Flush Static Files Cache”.
You can also do this by clearing the pub/static and var/view_preprocessed directories, but do not delete the .htaccess files in pub/static.
Now delete all files in
This will make less output new css. Clear your browser’s cache and refresh.
pub/static/frontend/exampleVendor/exampleTheme var/view_preprocessed/less This will make less output new css. Clear your browser’s cache and refresh.

Congrats! You’ve made your first customization on your first Magento 2 theme! If you’d rather not bother with all of this, there are some free themes available out there or you can hire our top-notch Magento 2 development team for your needs.
Similar Reads
How can we help?
Tell us about your inquiry and we’ll get back to you as soon as we can.